Multi-Room Reservations
A Multi-Room Reservation allows you to book multiple rooms under a single reservation and confirmation number. Multi-Room Reservations are commonly used for families, groups of friends, corporate travellers, or other guests who want to manage multiple rooms together.
Use this article to
- Create a Multi-Room Reservation
- Book rooms with different stay dates, occupancy, or Rate Plans
- Assign guests to individual rooms
- Create a Split Room Reservation when a guest changes rooms during their stay
- Manage folios and payments for individual rooms
- Check rooms in or out together or individually
- Separate a room from a Multi-Room Reservation into its own reservation
When to Use a Multi-Room Reservation
Use a Multi-Room Reservation when multiple rooms should remain connected under a single reservation and confirmation number.
| Example | When to Use |
|---|---|
| Family or Group Travel | Book multiple rooms together while assigning different guests to each room. |
| Different Stay Details | Book rooms with different stay dates, occupancy, Rate Plans, or room types under the same reservation. |
| Separate Room Billing | Keep the rooms together while maintaining a separate folio for each room. |
| Guest Changing Rooms | Use a Split Room Reservation when the same guest needs to stay in different rooms during different portions of the stay. |
Note: A Multi-Room Reservation can include up to 20 rooms.
Create a Multi-Room Reservation
From the Reservation Dashboard, click New Reservation.
Step 1: Add Rooms
Enter the stay information for the first room:
- Check-In Date
- Check-Out Date
- Number of Adults
- Number of Children
- Rate Plan
To add another room to the reservation, click Add Room.
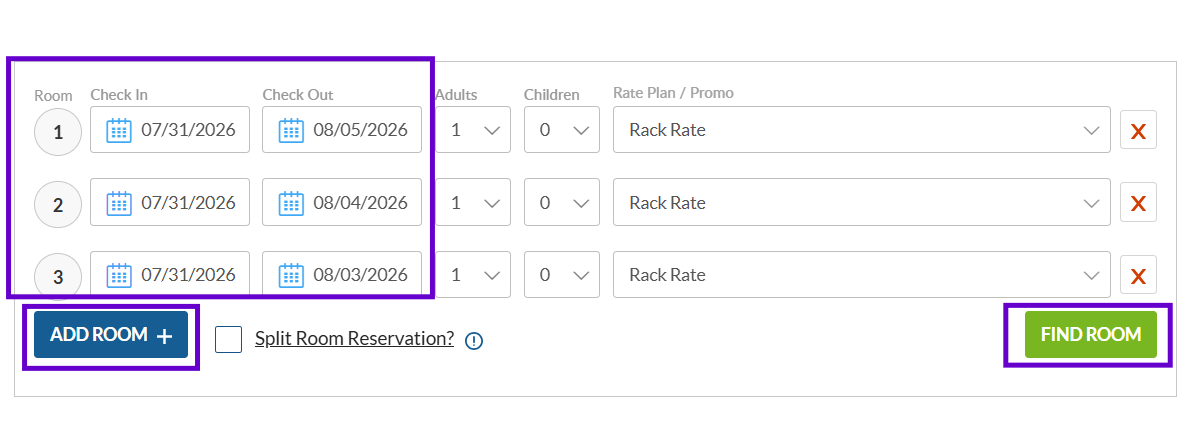
Continue clicking Add Room until you have added all of the rooms needed for the reservation.
Each room can have its own:
- Check-In and Check-Out dates
- Number of adults and children
- Rate Plan
Note: A Multi-Room Reservation can include up to 20 rooms.
After entering the stay information for each room, click Find Room.
Step 2: Select Rooms
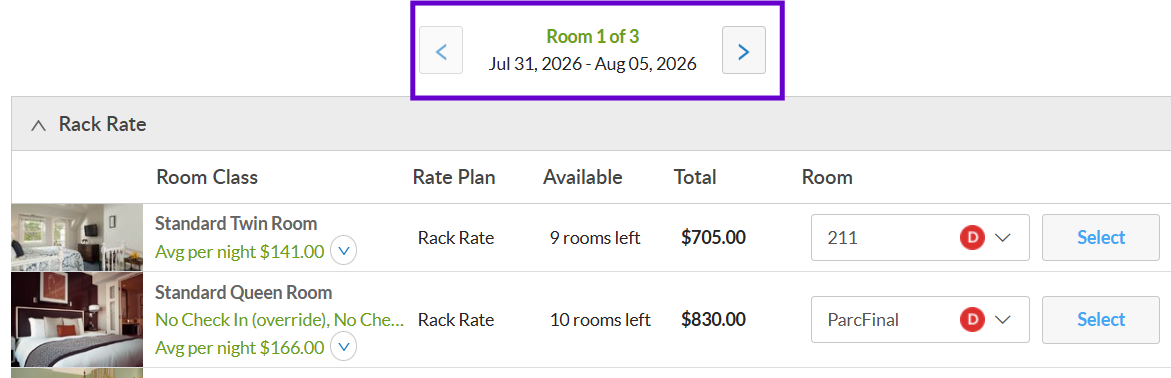
innRoad displays available room classes for each room included in the reservation.
Select the desired room class and room assignment for the first room, then continue selecting a room for each additional room in the reservation.
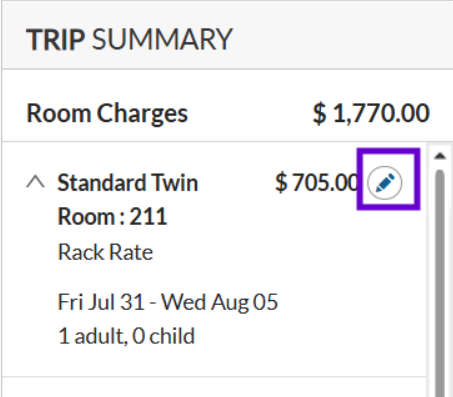
As rooms are selected, they are added to the Trip Summary, allowing you to review the rooms and charges included in the reservation.
If you need to change one of the selected rooms, click Edit for that room in the Trip Summary.
After all rooms have been selected, review the Trip Summary and click Next to continue.
Learn More: For additional information about room availability, room assignments, rates, and overbooking, see Create a Reservation - Complete Guide
Step 3: Enter Guest Information
After selecting all rooms, click Next to enter the guest information for the reservation.
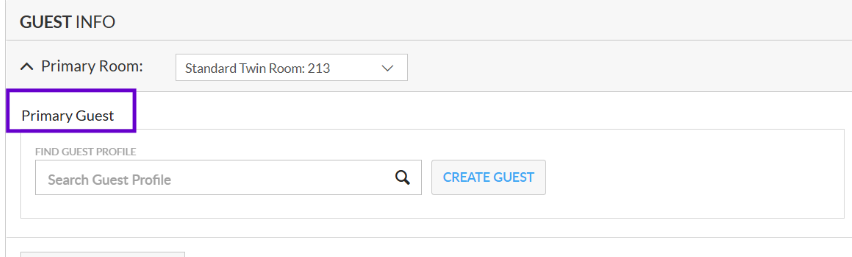
The first guest added to the reservation becomes the Primary Guest. The Primary Guest serves as the main contact for the Multi-Room Reservation.
You can assign different guests to individual rooms or use the Primary Guest information for multiple rooms.
Copy Primary Guest Information
If the same guest information should be associated with additional rooms, select Copy to copy the Primary Guest information to those rooms.
Otherwise, enter the appropriate guest information for each room.
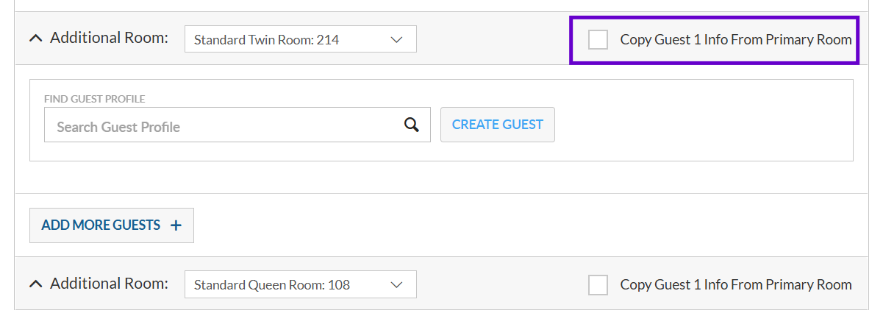
Note: Automated reservation emails are sent only to the Primary Guest's email address, even when different guests are assigned to individual rooms.
For information about creating a new Guest Profile, selecting an existing Guest Profile, Do Not Rent warnings, and other guest information options, see Create a Reservation - Complete Guide
Step 4: Complete and Book the Reservation
After entering the guest information, complete the remaining reservation details as needed.
This includes:
- Vehicle and Additional Information
- Payment & Billing
- Marketing Details
- Add-ons & Incidentals
- Tasks
- Notes
Review the Trip Summary to confirm the rooms, charges, taxes, fees, and deposit for the entire Multi-Room Reservation.
When everything is correct, click Book Now to create the reservation.
All rooms are created under a single reservation and confirmation number.
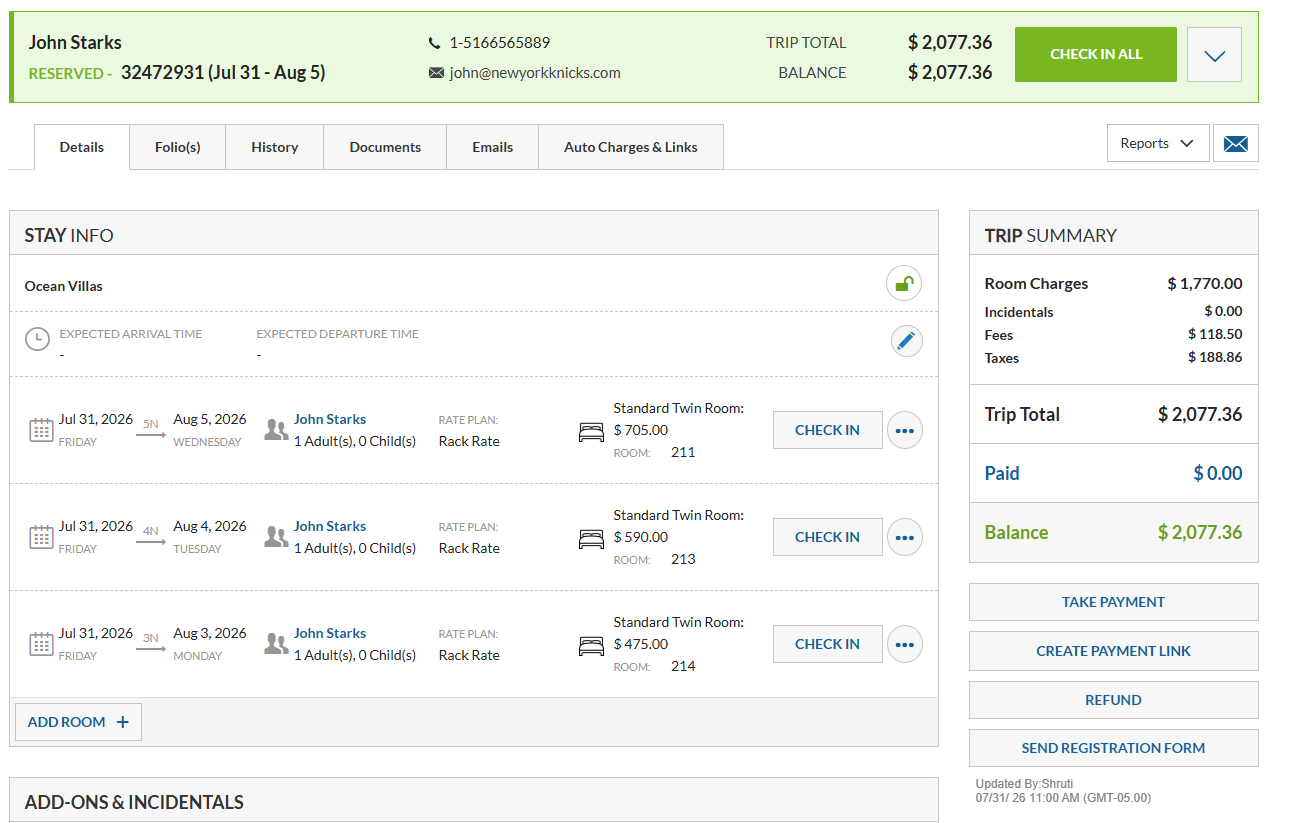
Learn More: For detailed information about Payment & Billing, Tax Exemptions, Add-ons, Tasks, Notes, deposits, and other options available during reservation creation, see Create a Reservation - Complete Guide
Split Room Reservations
A Split Room Reservation is a type of Multi-Room Reservation used when the same guest needs to change rooms during their stay.
Example: A guest stays from August 28–September 2. They stay in Room 101 from August 28–30 and move to Room 205 from August 30–September 2. The two room stays are consecutive and do not overlap, so they can be created as a Split Room Reservation.
Create a Split Room Reservation
From the New Reservation page:
- Enter the stay details for the first room.
- Click Add Room to add the next room.
- Select Split Room Reservation.
- Enter the stay dates and other details for each room.
- Click Find Room and select a room for each portion of the stay.
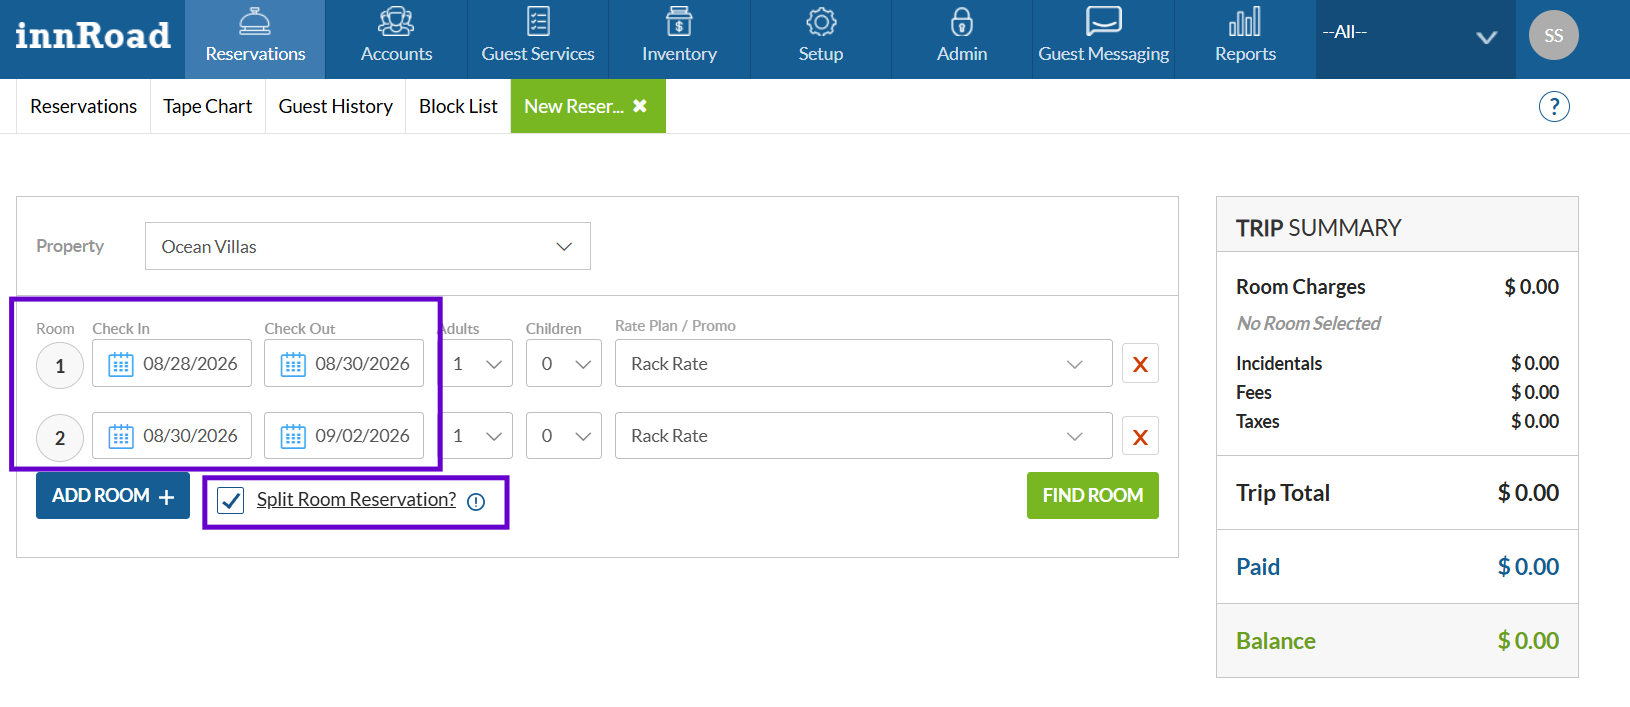
When Split Room Reservation is selected, innRoad automatically requires the stay dates for each room to be contiguous and prevents the dates from overlapping.
The rooms remain linked under the same reservation and confirmation number.
Example: If the first room is booked from August 10–12, the next room begins August 12 so there is no gap or overlap between the two portions of the stay.
Managing a Multi-Room Reservation
Folios & Payments
Each room in a Multi-Room Reservation has its own folio. This allows the rooms to remain connected under one reservation while charges and payments can be managed separately for each room.
Room Folios
Room charges are posted to the folio associated with each room. Additional charges can also be added to the appropriate room's folio throughout the stay.
This allows you to keep charges separated when different guests are responsible for their own rooms.

Payment Options
Payments can be handled differently depending on how the guests want to pay.
You can:
- Collect payment separately for each room or guest.
- Use a different payment method for each room's folio.
- Collect a payment on the Primary Guest's folio.
- Distribute a payment from the Primary Guest's folio across the other room folios as needed.
Example: A family books three rooms under one Multi-Room Reservation. Each family member can pay for their own room using a different payment method, or the Primary Guest can make a single payment that is distributed across the three room folios.
Keeping separate folios provides flexibility while allowing all of the rooms to remain part of the same Multi-Room Reservation.
Learn More: For detailed information about adding charges, collecting payments, transferring or distributing payments, and managing multiple folios, see Folio Overview.
Check In & Check Out
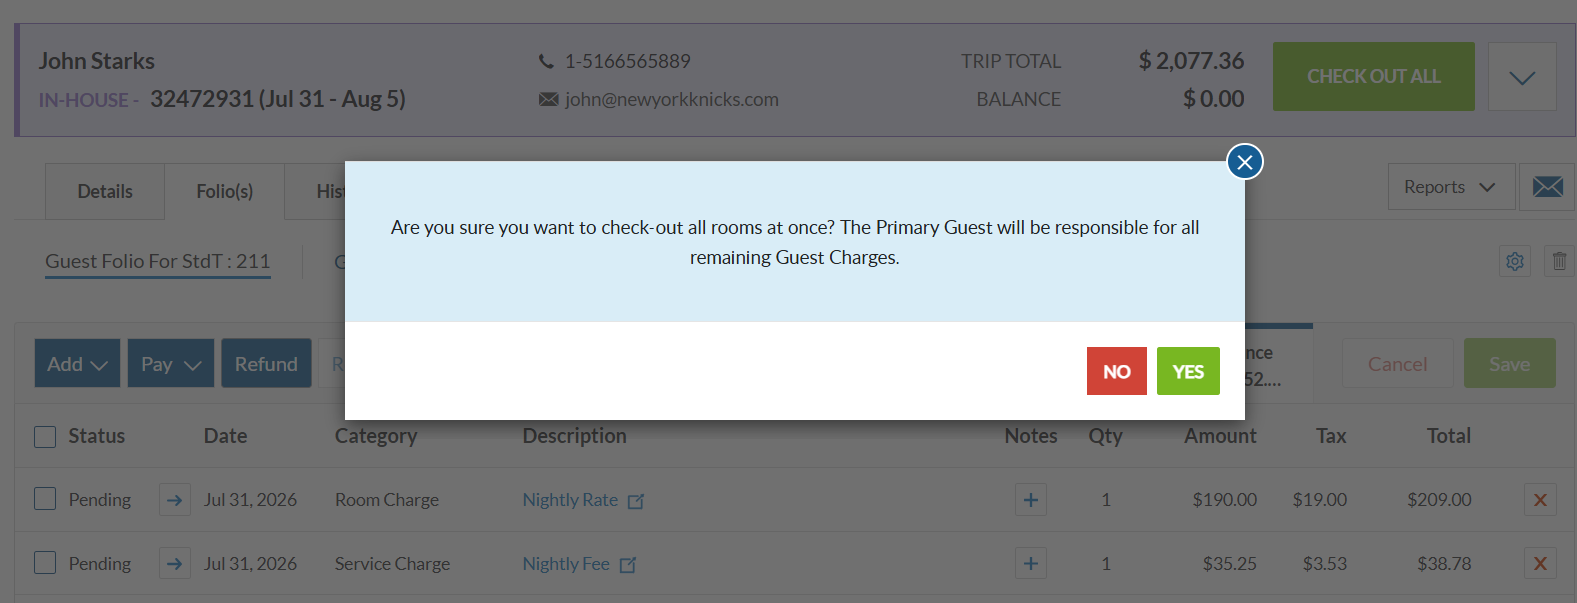
Rooms within a Multi-Room Reservation can be checked in and checked out together or individually.
Check In or Check Out All Rooms
When the guests are arriving or departing together, you can check in or check out all rooms in the Multi-Room Reservation at once.
This allows you to process the entire reservation without opening and updating each room individually.
Check In or Check Out Individual Rooms
You can also check in or check out rooms individually when guests arrive or depart at different times.
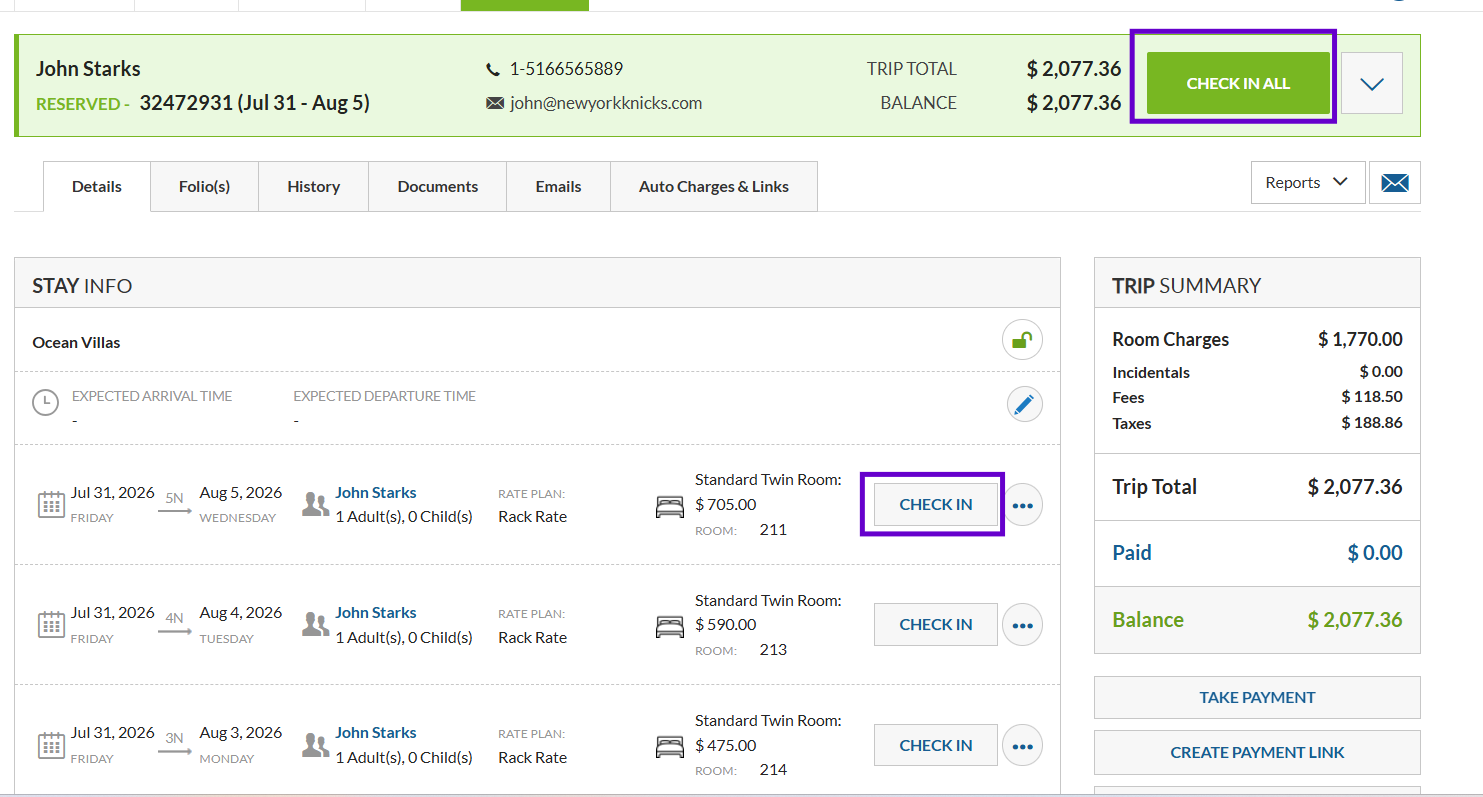
Example: A family has three rooms under one Multi-Room Reservation, but one guest arrives later in the evening. Check in the first two rooms when those guests arrive, then check in the remaining room separately when the other guest arrives.
Each room maintains its own check-in and check-out status while remaining part of the same Multi-Room Reservation.
Learn More: For detailed information about the check-in and check-out process, see Check In a Reservation and Check Out a Reservation.
Separate Room into Own Reservation
If one room in a Multi-Room Booking needs to be managed independently, you can separate it into its own reservation.
When to use this:
Use this option when:
- A guest wants their room managed separately.
- The room requires independent guest, billing, or reservation details.
- The room needs to be modified, checked in, or checked out independently.
- The guest wants to receive communications about their reservation directly.
How it works
- Open the Multi-Room Booking.
- Select the room you want to separate.
- Choose Separate Room into Own Reservation.
- Confirm the action.
The selected room will receive its own reservation number, while the remaining rooms stay under the original MRB.
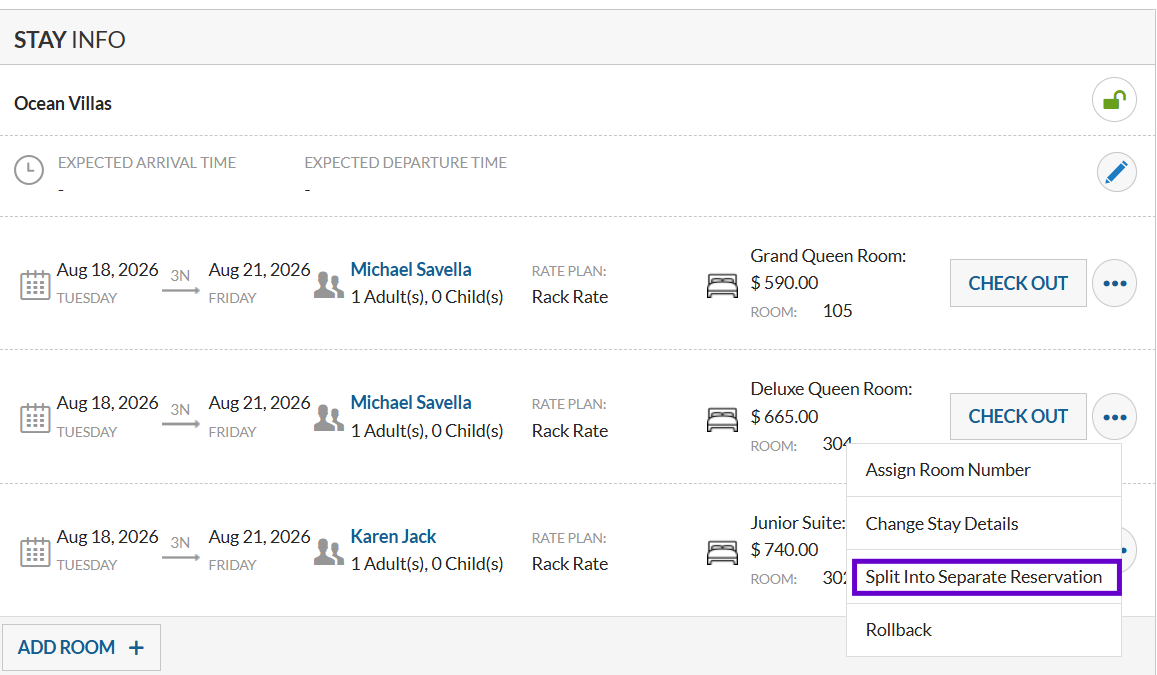
Note: The Primary Room cannot be separated into its own reservation.
Multi-Room Reservations from Online Bookings
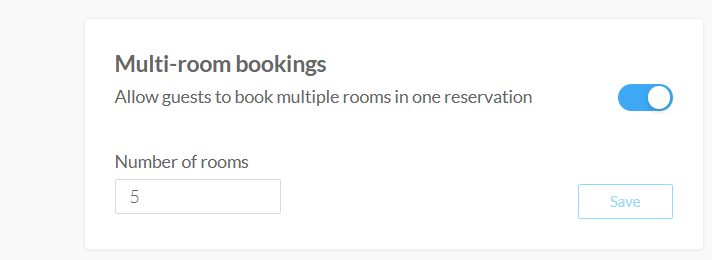
The Booking Engine can be configured to allow guests to book multiple rooms under a single reservation, creating a Multi-Room Booking (MRB) directly through the online booking process.
You can control the number of rooms a guest can book as part of an MRB by navigating to:
Setup > Booking Engine > Settings > Multi-Room Booking
Important Guidelines
- A maximum of 20 rooms can be added to one Multi-Room Booking.
- The Booking Engine can be configured to allow guests to book multiple rooms under a single reservation. You can manage the maximum number of rooms allowed by navigating to Setup > Booking Engine > Settings > Multi-Room Booking.
- Always use Add Room when adding additional rooms to the same reservation.
- Different rooms can have different dates, occupancy, and rate plans.
- Each room has its own folio.
- Payments and charges can be managed separately for each room or on the Primary folio.
- Rooms can be checked in and checked out together or individually.
- Some OTA reservations, including Booking.com, may be create as Multi-Room Bookings.
Related Articles
- Create a Reservation - Complete Guide
- Folio Overview
- Check In a Reservation
- Check Out a Reservation
- Online Check-In
Was this article helpful?
That’s Great!
Thank you for your feedback
Sorry! We couldn't be helpful
Thank you for your feedback
Feedback sent
We appreciate your effort and will try to fix the article